How to use High Tack?
High Tack application delivers maximum performance when done correctly, from surface preparation to gun application. This article summarizes the key points to consider for achieving full durability from high initial tack strength.
1. Surface Preparation
For successful bonding with High Tack, the most important step is surface preparation. The surface to be bonded must be dry, dust-free, and free of oil and dirt. According to some expert data sheets, alcohol (e.g., isopropyl) cleaning is an ideal method.
Ambient and surface temperature are also important: +5 °C to +40 °C is ideal for application. :contentReference[oaicite:1]{index=1}
Primer Application on Porous Surfaces
Some High Tack formulations may require a primer on porous surfaces. This allows the adhesive to penetrate the pores and establish a strong bond. :contentReference[oaicite:2]{index=2}
2. Application Equipment and Technology
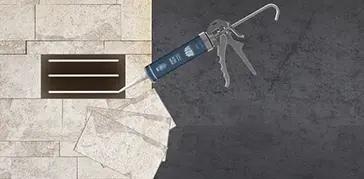
When applying High Tack, it is essential to use a high-quality gun (seal gun). A V-shaped nozzle is particularly recommended as it sprays the adhesive evenly and controllably. :contentReference[oaicite:3]{index=3}
Applying the material in **vertical** strips rather than as “dots” yields more successful results. The ideal distance between strips is around 10-20 cm in most technical documents. :contentReference[oaicite:4]{index=4}
3. Assembly and Pressure
The parts should be joined immediately after application. Then, initial adhesion is achieved by applying manual pressure for a few seconds. With this brand and type of adhesive, external support (clipsing, fastening) is usually not required due to the high initial adhesion strength. :contentReference[oaicite:5]{index=5}
After the parts are joined, the adhesive layer should be approximately 2–3 mm thick. This thickness supports both good adhesion and even curing. :contentReference[oaicite:6]{index=6}
4. Cleaning Up Excess Material
Excess adhesive should be removed immediately with a spatula or damp cloth during application. Alcoholic solvents can be used to clean uncured (unhardened) High Tack residue.
5. Curing Process and Support Requirements
High Tack's initial setting is usually very fast, so it may not require support. However, the full strength (curing) process varies depending on environmental conditions. :contentReference[oaicite:8]{index=8}
During application, support (clipping) should be considered in challenging conditions such as high humidity or low temperature. This ensures the adhesive remains in place until a full bond is formed.
6. Post-Implementation Recommendations
- Tool cleaning: The gun and applicators should be cleaned with a solvent before the adhesive hardens. :contentReference[oaicite:9]{index=9}
- Safety: It is recommended to wear protective gloves during application. Prolonged contact should be avoided.
- Test application: Adhesion should be tested by performing a small trial on surfaces that will be used for the first time. :contentReference[oaicite:10]{index=10}
7. Common Mistakes and What to Avoid
Some users may apply the adhesive too thinly, which doesn't provide sufficient hold. Applying it too thickly can also hinder curing. Applying it in strips provides the ideal balance.
Applying to dusty, dirty, or oily surfaces reduces adhesion. Therefore, surface preparation is particularly important. Additionally, adhesion may be poor if the temperature is not suitable during application.
On some surfaces (for example, certain types of plastics), application may be faulty without testing the adhesive's compatibility. Therefore, a "small test" is recommended on every new surface.
8. Sample Application Scenarios
- When applying High Tack for fixing heavy panels or decorative boards, vertical strips can be applied, then pressed down to achieve a quick initial grip.
- When assembling metal profiles, applying the adhesive with a 2-3 mm gap and then pressing firmly will improve performance.
- Light decorative elements can be applied indoors without needing extra support.
Conclusion
To fully utilize the strength of High Tack adhesive, correct application is essential. Following steps such as surface preparation, selecting the appropriate gun and nozzle, correct strip application, and pressure bonding will result in a long-lasting and robust bond. You can increase your success rate by following this guide.
The information in this text may vary from time to time depending on the manufacturer. Always check the product label.